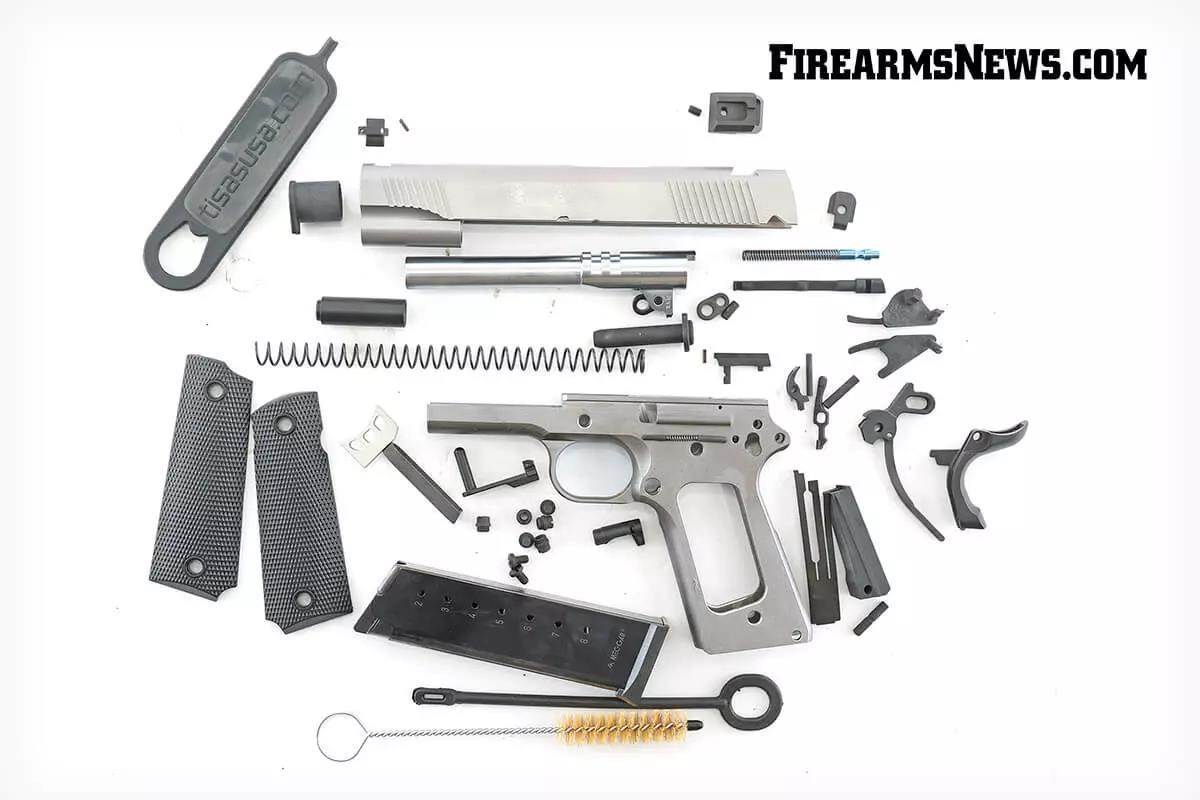
The TISAS Duty Builders Kit, .45, with all the parts and cleaning tools.
August 30, 2024
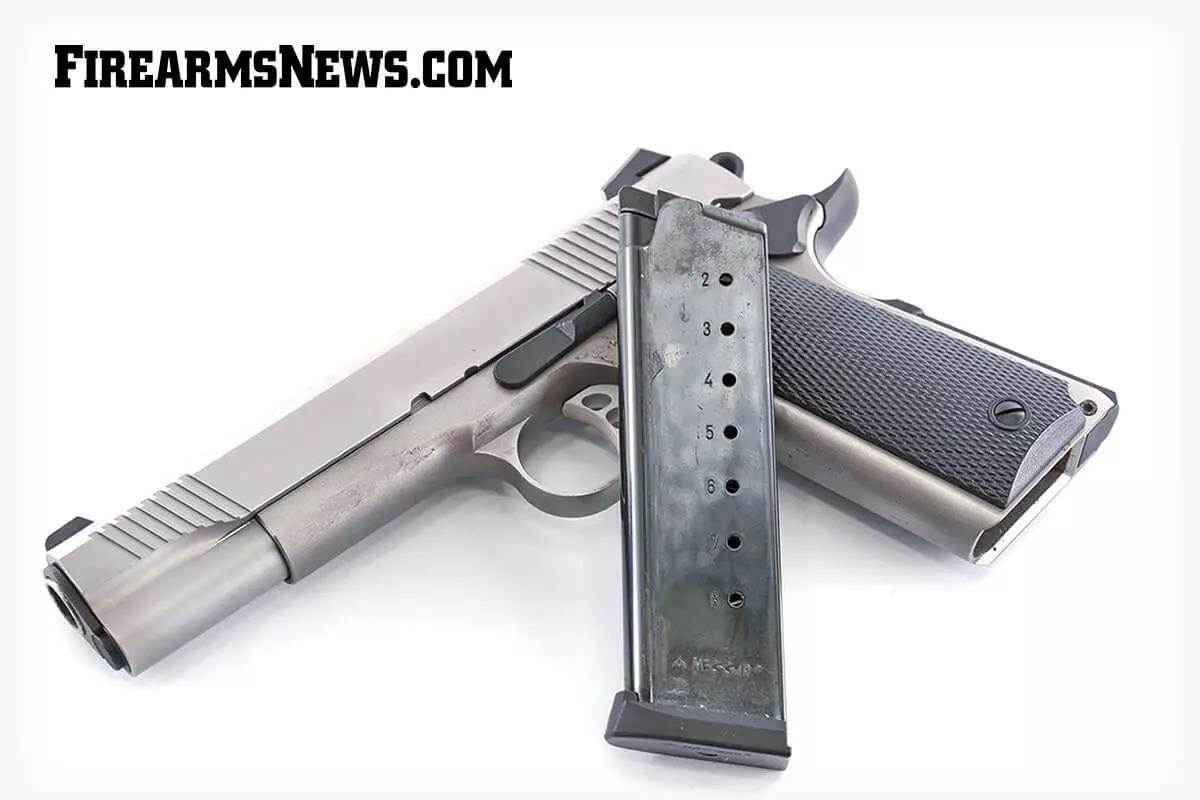
Some people think that because the 1911 was designed more than a century ago, it is some arcane task to put one together. They’ll happily dive into putting an AR-15, or a Glock, or even an AK together, but a 1911? Oh, the horror. Really? Well, TISAS is here to put that idea to rest. They offer the Duty Builders Kit, .45 ACP, for your assembly pleasure. In the box is everything you need, parts-wise. You may need a few tools, and you may not, but you won’t need anything that you probably don’t already have. And if not, then Brownells is a few mouse-clicks away. The base gun is a blued-slide one, with the frame stainless and the various small parts black oxide or Cerakote finished. Me, I opted for a stainless slide because I have enough guns that are two-tone, and I wanted to see if they had sussed out the details of machining stainless. (Quick answer; yes.)

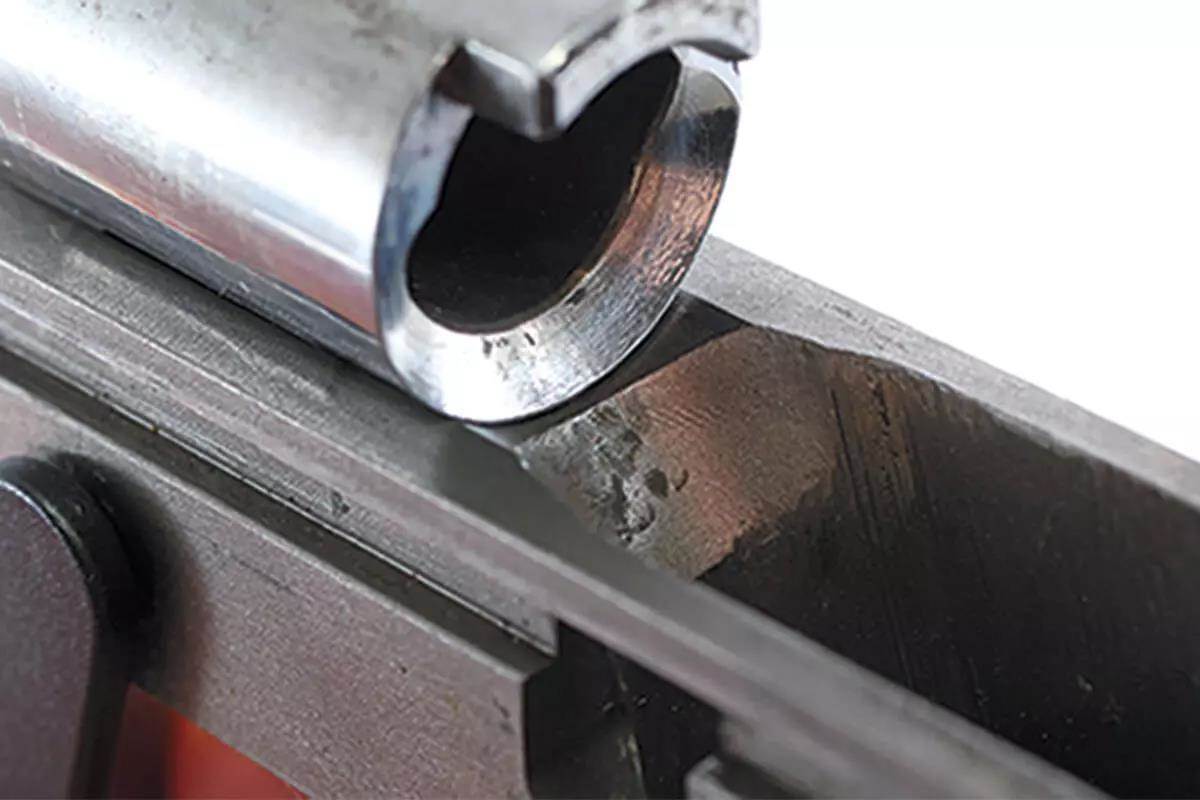
The Duty Builders Kit is a government sized 1911 in .45 (naturally) and a quick inventory showed me they had the details down right. The slide has cocking serrations fore and aft, there’s a well-shaped hi-rise grip safety, a swoopy commander-style hammer and ambi thumb safety. There are other details that show the paying-attention-ness of the TISAS folks. The sights are Novak-style, and near as I can tell with calipers, Novak-compatible. (I’m not going to take a Novak set off of one of my 1911s just to check, but the measurement check out.) And, the front sight includes a roll pin to lock the sight in place once installed. And, the base is contoured to match the slide radius, a very nice touch. Other details I like include the slide stop pin tunnel is beveled on the right side, to let you push it for disassembly. A necessary detail because the slide stop pin is shortened enough to not protrude from the frame. This is custom pistolsmithing territory in a production gun. In learning how to assemble firearms from parts, or add parts, I developed a system: I do it dry first. So, I assembled the Duty Builders kit as much as I could by hand. I really expected to have to break out the tools early on, but I was able to assemble everything by hand, with two exceptions. The link pin had to be tapped in place, and the front ejector leg had to be polished down to fit into the hole bored for it. I did not install the sights, nor the thumb or grip safety. Everything else just slipped into place as if it had been assembled before, and I was just re-assembling it after a cleaning. I checked the barrel fit and it was fine. This I was thankful for, as the barrel is not stainless but hard-chromed, and if I had had to do any fitting I’d have had to deal with the chrome, which is, oh, hard.
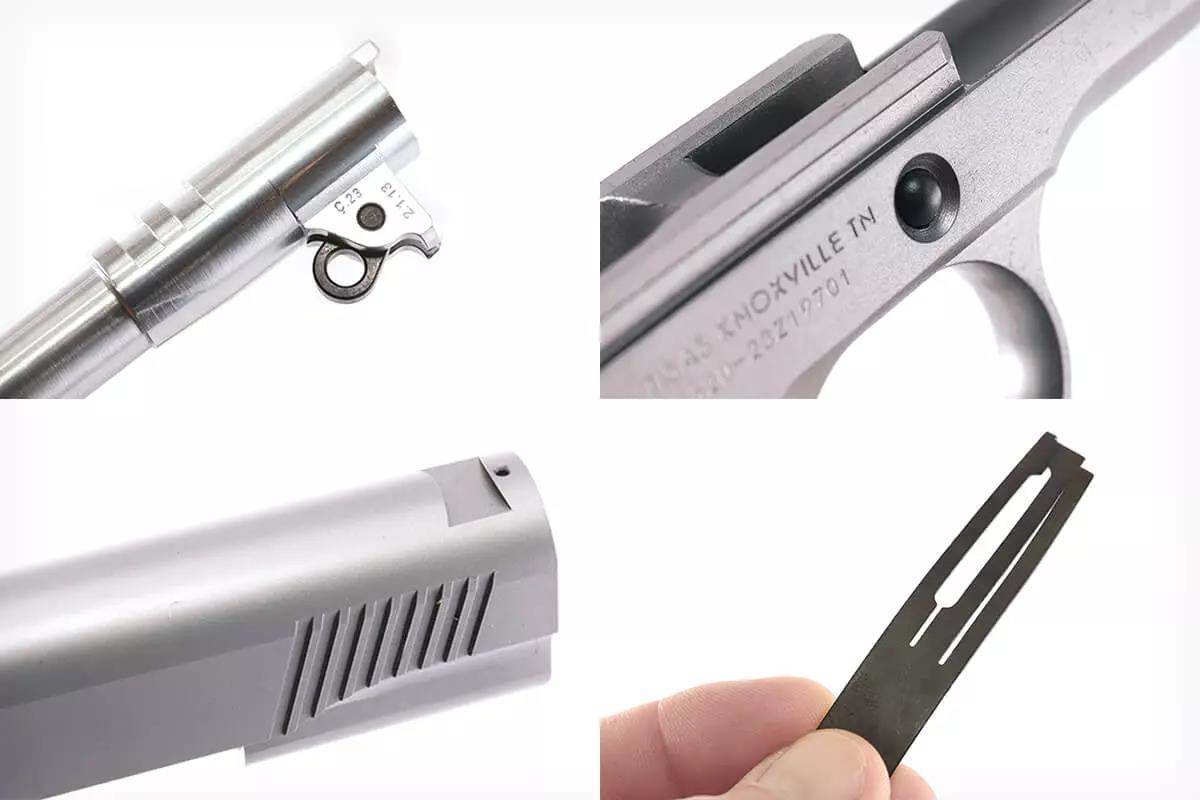
The slide is not a custom-fit to the frame, but it is tighter than I’ve seen on some production guns assembled and sent to me for testing. The firing pin plate didn’t need fitting, and the extractor (surprisingly, but not much of a surprise) didn’t its tension adjusted. The barrel timing was correct, and the link-down worked as-expected. That is, the barrel didn’t rub on the slide while cycling, and the bottom lug whacked the bowtie up near the chamber, as it is supposed to. The barrel ramp had when linked down the required small gap to the frame ramp, and while neither were a mirror polish, they were smooth and at their correct angle and locations. The trigger pull was OK, but I wasn’t worried about that, and I was really thinking; “Maybe I should just take it to the range and test-fire it.”, but I kept eyeing the sharp edges of the open back of the frame. Nope.

OK, first things first, fit the grip safety. This was easy, as again, it was a matter of assembly. I used a drone thumb safety, one with the safety lug ground clear, in order to have a pivot shaft for the grip safety. Just dropped in, the grip safety did its job properly, stopping rearward movement of the trigger until I depressed it. The grip safety had to be depressed a bit too deep into the frame to disengage for my tastes, but that is a minor matter of stoning a certain edge. So, on to the thumb safety. I removed the drone safety, took out the grip safety, and installed the one TISAS provided. I pressed the safety up into the safe position, and I could feel it bearing on the sear foot. I did this a couple of times and then took the safety out. I could see the mark left by the rubbing, on the lug, and that was where I took a few passes with a fine stone, and viola, the safety now clicks up and down properly, and stops sear movement. The right-hand lever of the thumb safety has a flange running alongside the frame, and the grip on that side has a recess molded into it that the flange sets into. You’ve seen it before on other 1911s, it is how the right-hand lever is kept in place. I wasn’t too optimistic about the plain old plastic grips holding the lever in place, but once the Duty Builder Kit was assembled, the lever-to-grip fit was no problem.
Advertisement
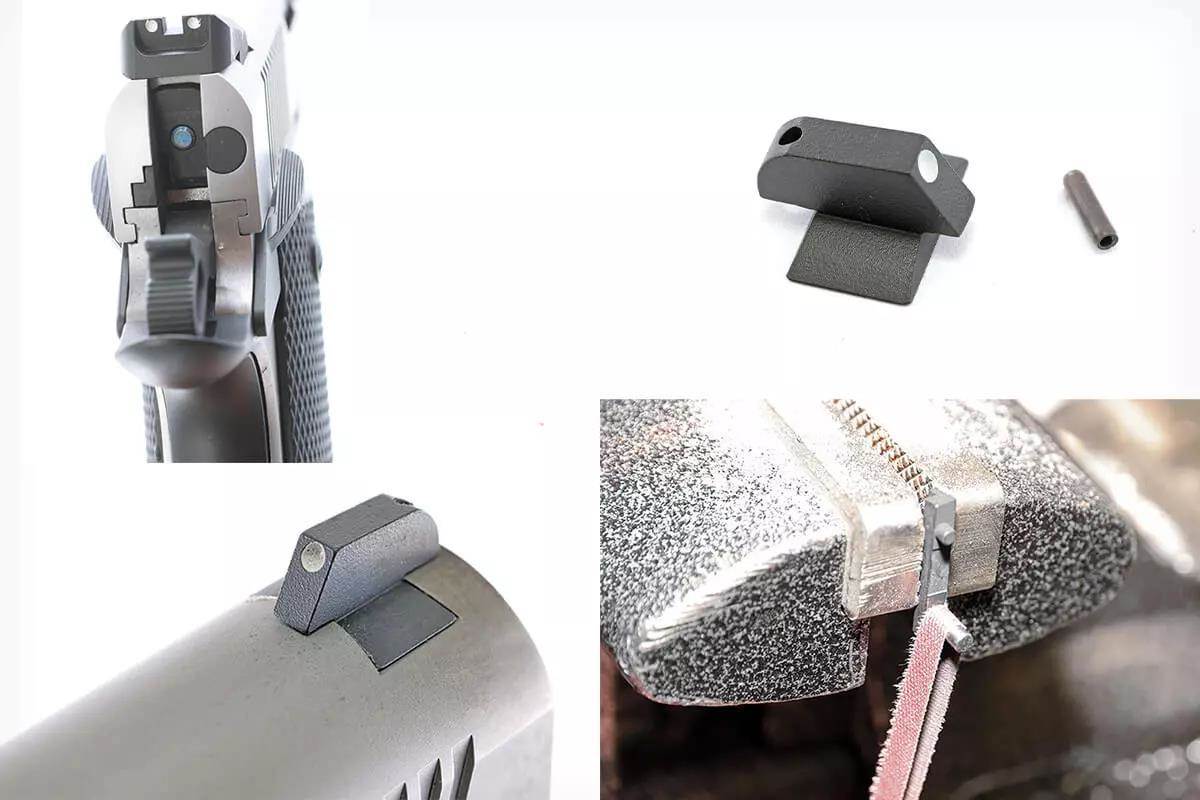
The sights, well, the sights are a straightforward task. Remember the basic rule of gunsmithing: make your changes on the lower-cost or easier-to-replace part. (So, no filing on the slide.) I filed the front bevel of the rear sight, just a small amount, to get it to fit. It still required some tapping with a hammer and brass drift. Which is good, it will stay in place. The front sight required a few passes of the file on the bottom of the sight base, again, to let it get started and press into place. On the front, I moved it until the locking hole lined up with the sight hole, and then drove the roll pin into place. Me being me, I then used some wicking Loctite as insurance. I left the rear sight at the measured center of the slide, and zeroed it at the range during test-firing. I only had to move it a few thousandths, and then I tightened down the included locking screw. Done.
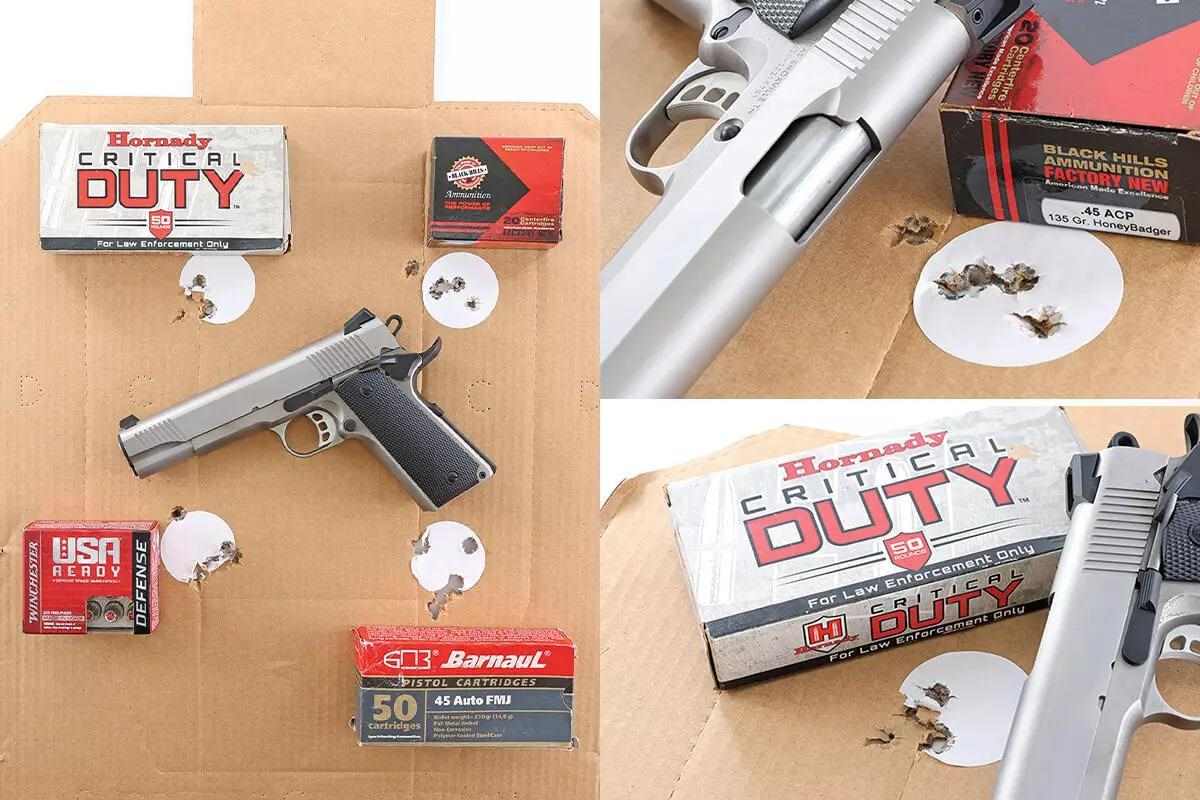
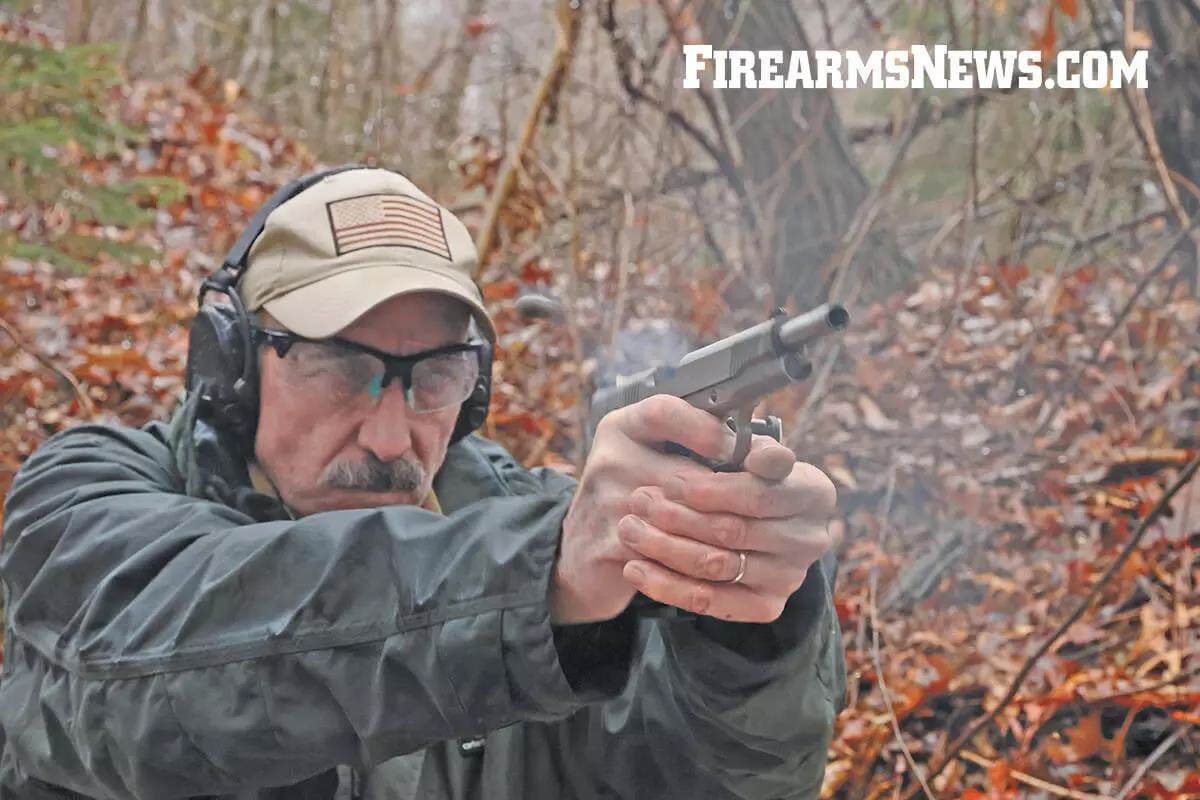
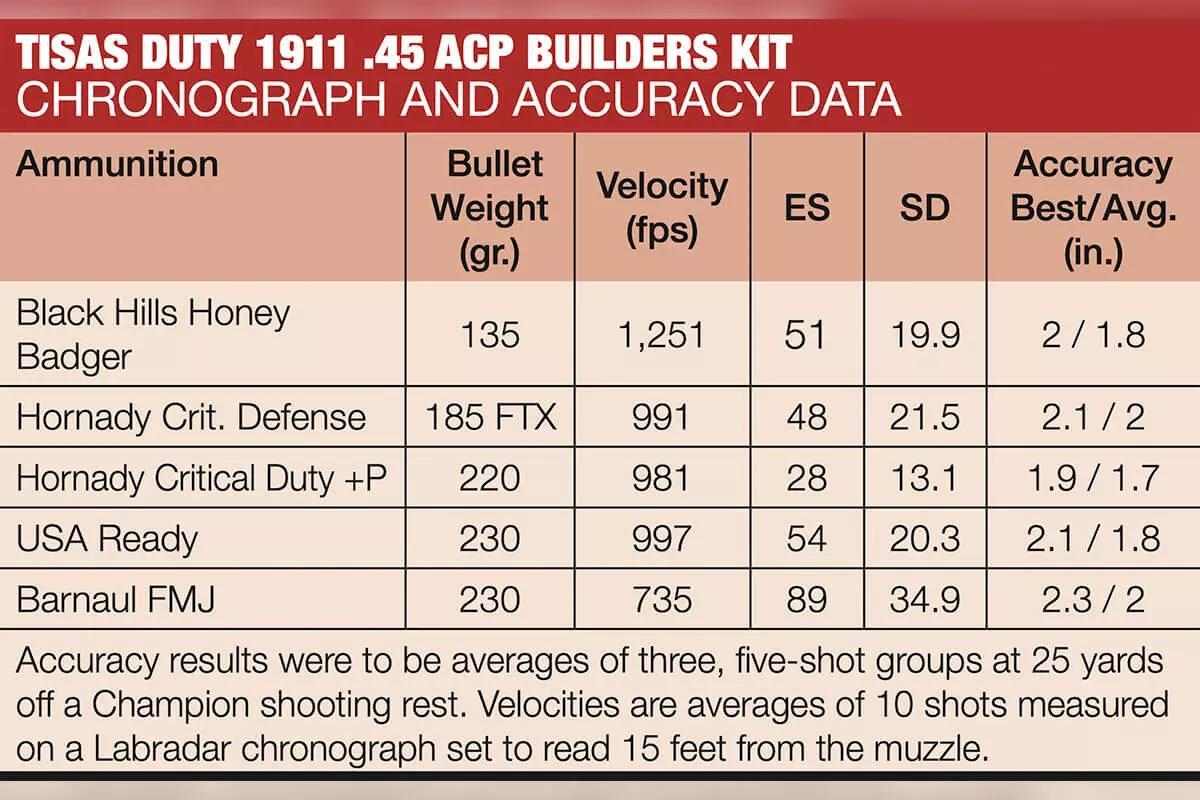
I then did the usual test-firing for function, accuracy and chrono results, and waddaya know, it performed like a factory-built 1911. I did the bulk of the initial testing with the TISAS-supplied eight-round magazine, and it too worked like a champ. When it came time to have some fun mowing down the plate rack, I used whatever 1911 magazine came to hand, and they all worked as-expected as well. No malfunctions at all during testing. Accuracy? I don’t know what magic they are performing over there in the TISAS plant, but this 1911 just shoots like a house afire. Accuracy galore. It was a cold and rainy day, and maybe I should reserve those days for accuracy testing, because I was on. Nah, it has to be the pistol. Now, not all is sweetness and light. The Duty Builders Kit has some shortcomings. Well, shortcomings if you are expecting more than a no-frills 1911 that you built yourself.
The grips are just your basic plastic with molded-in checkering. Nothing fancy, no G10, or exotic wood, but then again how blingy do you have to be? And if you want bling, there is no end of grip makers who can give you a step up. (I’m looking at VZ Grips as I type this.) The frame does have a lifted frontstrap, which is a very nice detail, but there is no checkering or any other non-slip pattern there, or other glare reduction elsewhere. Again, this can be corrected, and once you have built your very own 1911, you can then see about learning to checker, or sending it off if you wish. The trigger pull is good, registering just over four and a half pounds on my digital scale, but the trigger does not have an overtravel screw in it. Again, this is easily changed, as the list of replacement triggers on Brownells is over a dozen, and you can easily come up with that many more again outside of their offerings. And the current hot property in the 1911 universe is a 9mm chambering, which this one isn’t. However, considering how ear-to-the-ground a company TISAS is, I would not be surprised to see that as an option in the future. One last “oh darn” detail: despite this being a kit, it is still a firearm, and it will have to be shipped to your local gun shop before you can pick it up.
Advertisement
Once I had done the testing, the chrono, and accuracy work, I checked the various details on the fit list and checked tightness. Since I had zeroed it, I applied wicking Loctite to the sights, removed, degreased, Loctite-d and then staked the grip screw bushings and sensitized the grip safety. The slide stop got tested for assurance on proper hold open, and I looked at the dimensions of the breechface sidewall and slide stop lug. (They did not need any work, since you’re asking.) Because I had done a bunch of shooting and dry-firing, I re-tested the trigger pull, and it had gotten cleaner and a few ounces lighter, as expected. You know, all the details a pistolsmith can’t help but look at, as natural as breathing. Why do all this?
Because I wasn’t going to let a gem like this get away. Accuracy, reliability, and built by me? I had already decided to send TISAS a check for it. Yes, I risked being admonished by my gun writers guild steward for buying a test gun. Why not? I built it, and I only buy one a year or so. (No, they are not freebies, they almost always go back whence they came.) You won’t need jigs or fixtures to assemble your kit. You won’t need specialty tools, and if there is something that needs fitting, the regular gunsmithing tools you (probably) already have will do the job. Treat yourself. For the cost, and the bragging rights of “I built this one” you can get into a 1911 and do it in style.
Tisas Duty 1911 Builders Kit Specs
- Type: hammer-fired, semi-automatic
- Caliber: .45 ACP
- Capacity: .45 ACP
- Capacity: 8+1 rds.
- Barrel: 5 in.
- Overall Length: 8.4 in.
- Weight: 41 oz.
- Finish: Stainless steel w/blued parts
- Grips: Plastic
- Sights: Novak front and rear, plain blued steel
- Trigger: 4 lbs., 2 oz.
- MSRP: $350
- Contact: Tisas USA
Video That May Interest You