Intro
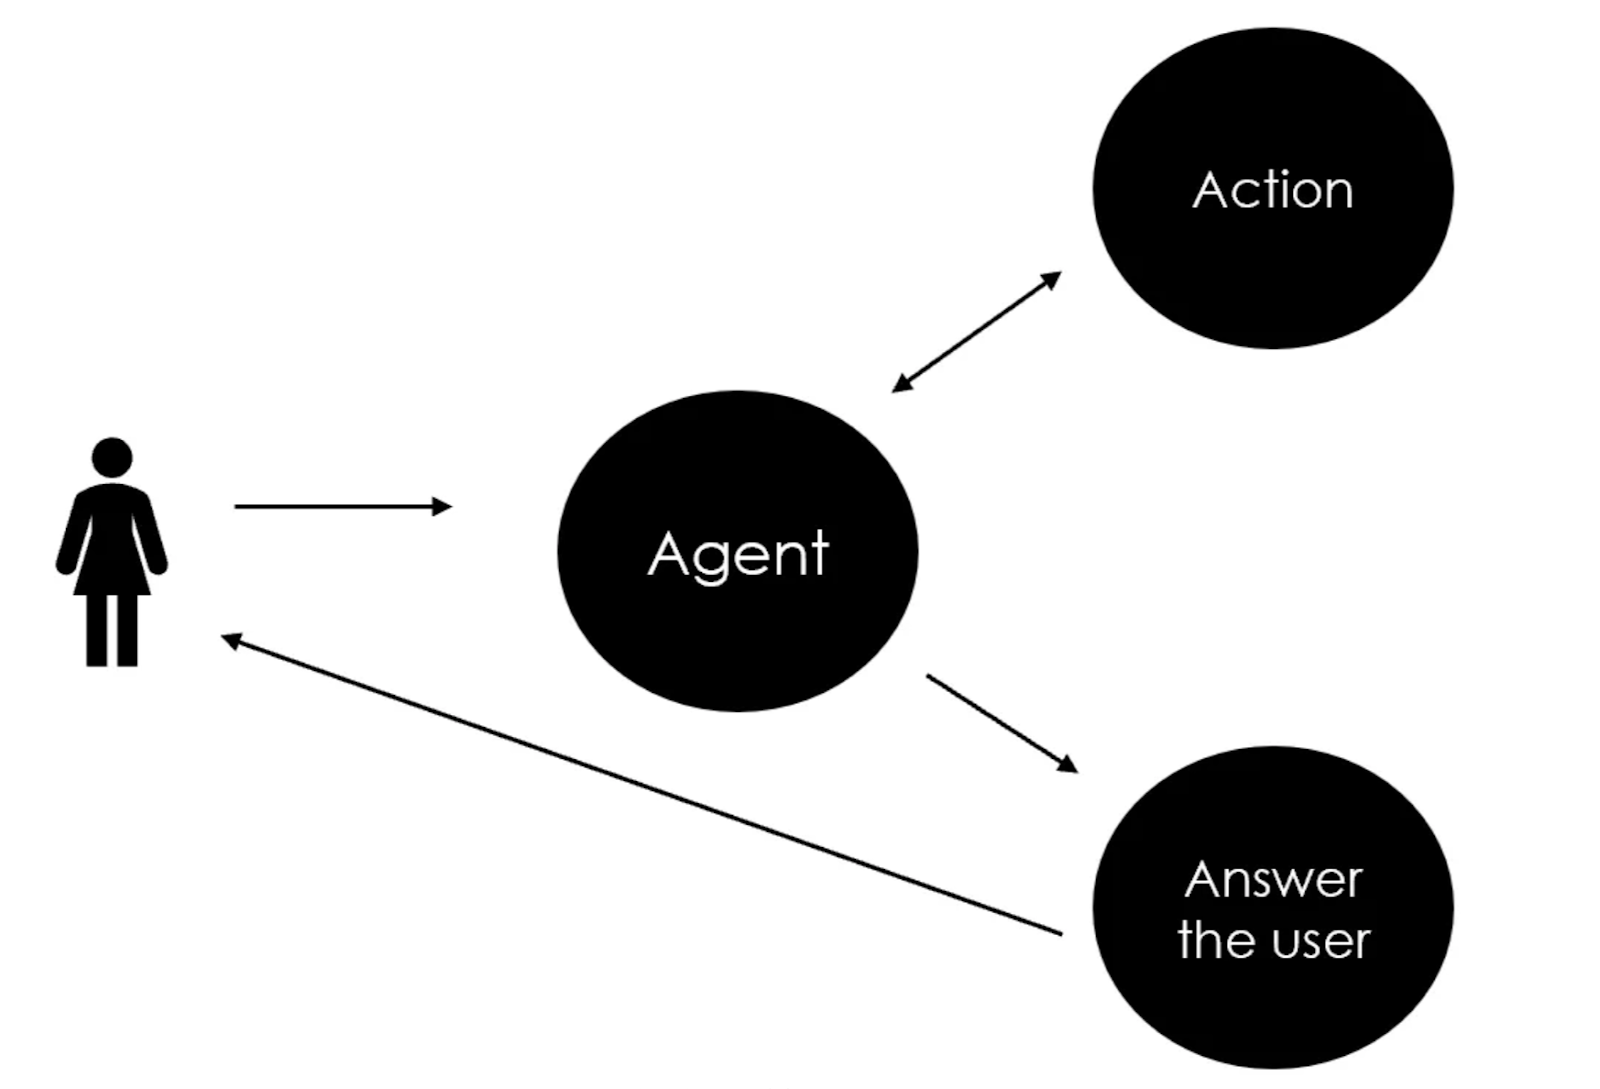
AI Agents are autonomous programs that perform tasks, make decisions, and communicate with others. Normally, they use a set of tools to help complete tasks. In GenAI applications, these Agents process sequential reasoning and can use external tools (like web searches or database queries) when the LLM knowledge isn’t enough. Unlike a basic chatbot, which generates random text when uncertain, an AI Agent activates tools to provide more accurate, specific responses.
We are moving closer and closer to the concept of Agentic Ai: systems that exhibit a higher level of autonomy and decision-making ability, without direct human intervention. While today’s AI Agents respond reactively to human inputs, tomorrow’s Agentic AIs proactively engage in problem-solving and can adjust their behavior based on the situation.
Today, building Agents from scratch is becoming as easy as training a logistic regression model 10 years ago. Back then, Scikit-Learn provided a straightforward library to quickly train Machine Learning models with just a few lines of code, abstracting away much of the underlying complexity.
In this tutorial, I’m going to show how to build from scratch different types of AI Agents, from simple to more advanced systems. I will present some useful Python code that can be easily applied in other similar cases (just copy, paste, run) and walk through every line of code with comments so that you can replicate this example.
Setup
As I said, anyone can have a custom Agent running locally for free without GPUs or API keys. The only necessary library is Ollama (pip install ollama==0.4.7), as it allows users to run LLMs locally, without needing cloud-based services, giving more control over data privacy and performance.
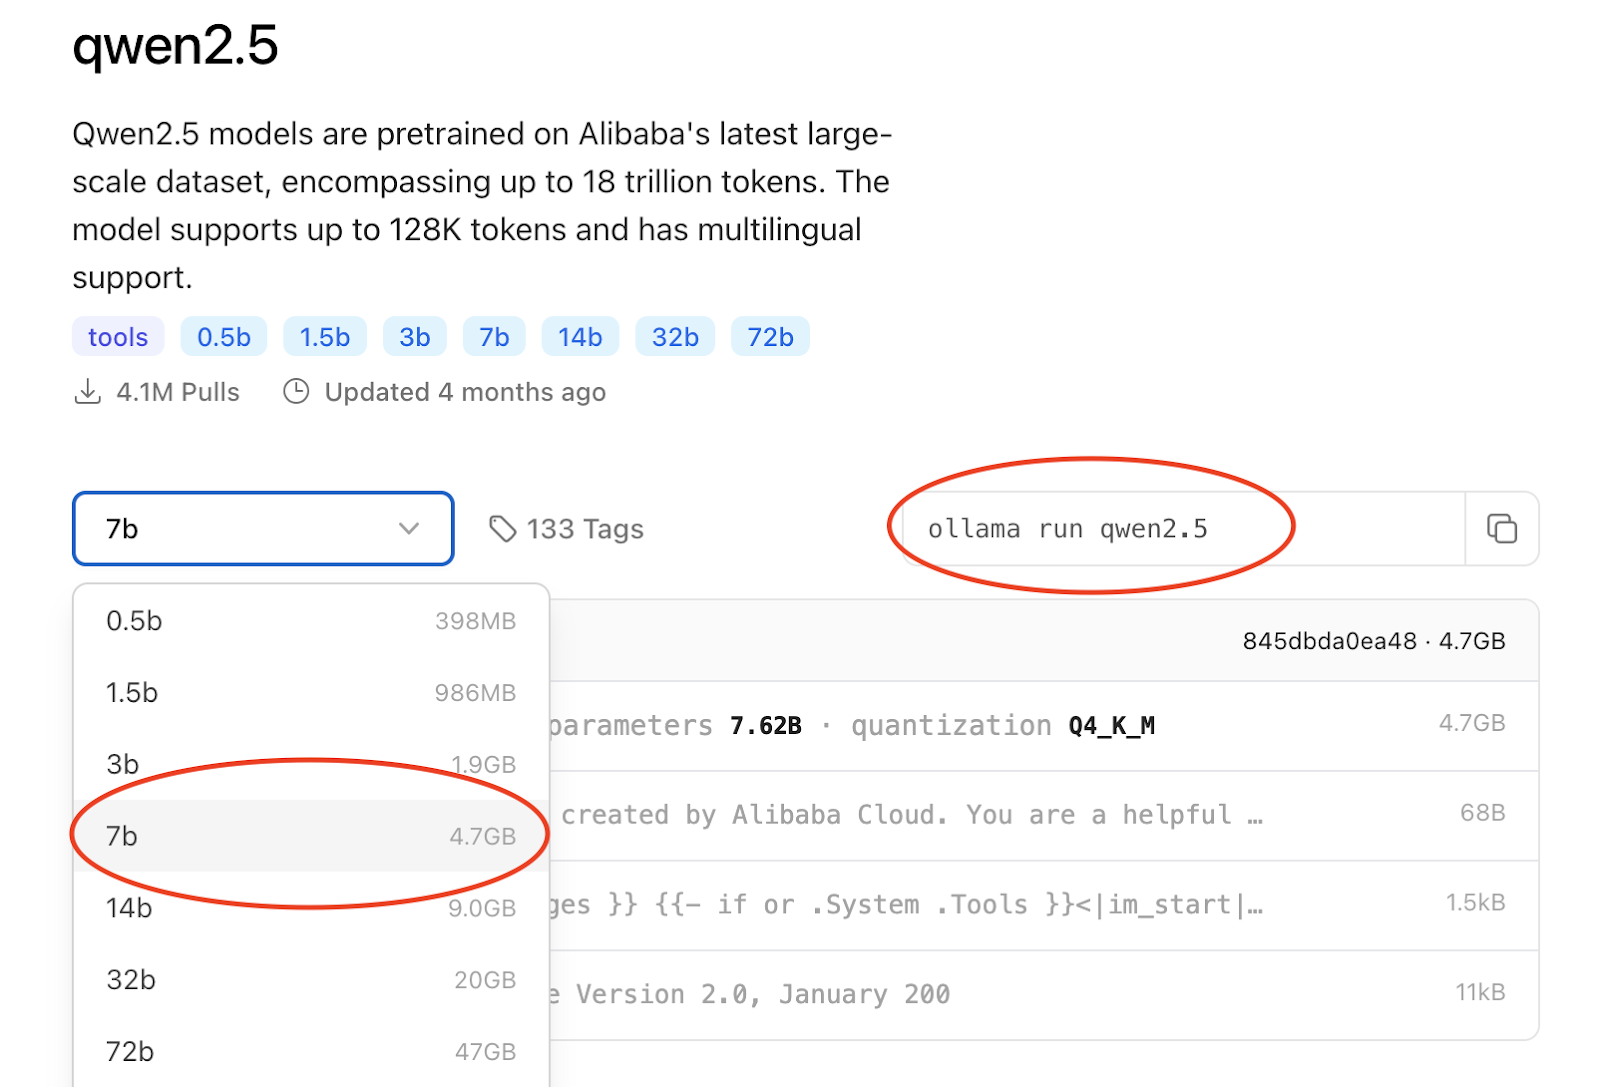
First of all, you need to download Ollama from the website.
Then, on the prompt shell of your laptop, use the command to download the selected LLM. I’m going with Alibaba’s Qwen, as it’s both smart and lite.
After the download is completed, you can move on to Python and start writing code.
import ollama
llm = "qwen2.5"
Let’s test the LLM:
stream = ollama.generate(model=llm, prompt=""'what time is it?''', stream=True)
for chunk in stream:
    print(chunk['response'], end='', flush=True)
Obviously, the LLM per se is very limited and it can’t do much besides chatting. Therefore, we need to provide it the possibility to take action, or in other words, to activate Tools.
One of the most common tools is the ability to search the Internet. In Python, the easiest way to do it is with the famous private browser DuckDuckGo (pip install duckduckgo-search==6.3.5). You can directly use the original library or import the LangChain wrapper (pip install langchain-community==0.3.17).
With Ollama, in order to use a Tool, the function must be described in a dictionary.
from langchain_community.tools import DuckDuckGoSearchResults
def search_web(query: str) -> str:
  return DuckDuckGoSearchResults(backend="news").run(query)

tool_search_web = {'type':'function', 'function':{
  'name': 'search_web',
  'description': 'Search the web',
  'parameters': {'type': 'object',
                'required': ['query'],
                'properties': {
                    'query': {'type':'str', 'description':'the topic or subject to search on the web'},
}}}}
## test
search_web(query="nvidia")
Internet searches could be very broad, and I want to give the Agent the option to be more precise. Let’s say, I’m planning to use this Agent to learn about financial updates, so I can give it a specific tool for that topic, like searching only a finance website instead of the whole web.
def search_yf(query: str) -> str:  engine = DuckDuckGoSearchResults(backend="news")
  return engine.run(f"site:finance.yahoo.com {query}")

tool_search_yf = {'type':'function', 'function':{
  'name': 'search_yf',
  'description': 'Search for specific financial news',
  'parameters': {'type': 'object',
                'required': ['query'],
                'properties': {
                    'query': {'type':'str', 'description':'the financial topic or subject to search'},
}}}}

## test
search_yf(query="nvidia")
Simple Agent (WebSearch)
In my opinion, the most basic Agent should at least be able to choose between one or two Tools and re-elaborate the output of the action to give the user a proper and concise answer.
First, you need to write a prompt to describe the Agent’s purpose, the more detailed the better (mine is very generic), and that will be the first message in the chat history with the LLM.
prompt=""'You are an assistant with access to tools, you must decide when to use tools to answer user message.'''
messages = [{"role":"system", "content":prompt}]
In order to keep the chat with the AI alive, I will use a loop that starts with user’s input and then the Agent is invoked to respond (which can be a text from the LLM or the activation of a Tool).
while True:
    ## user input
    try:
        q = input('🙂 >')
    except EOFError:
        break
    if q == "quit":
        break
    if q.strip() == "":
        continue
    messages.append( {"role":"user", "content":q} )

    ## model
    agent_res = ollama.chat(
        model=llm,
        tools=[tool_search_web, tool_search_yf],
        messages=messages)
Up to this point, the chat history could look something like this:

If the model wants to use a Tool, the appropriate function needs to be run with the input parameters suggested by the LLM in its response object:
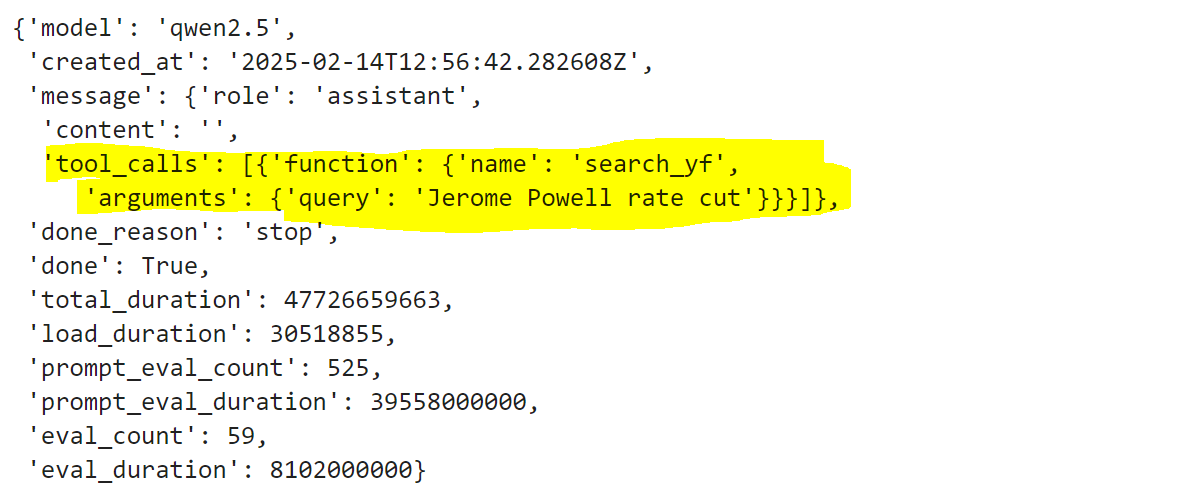
So our code needs to get that information and run the Tool function.
## response
    dic_tools = {'search_web':search_web, 'search_yf':search_yf}

    if "tool_calls" in agent_res["message"].keys():
        for tool in agent_res["message"]["tool_calls"]:
            t_name, t_inputs = tool["function"]["name"], tool["function"]["arguments"]
            if f := dic_tools.get(t_name):
                ### calling tool
                print('🔧 >', f"\x1b[1;31m{t_name} -> Inputs: {t_inputs}\x1b[0m")
                messages.append( {"role":"user", "content":"use tool '"+t_name+"' with inputs: "+str(t_inputs)} )
                ### tool output
                t_output = f(**tool["function"]["arguments"])
                print(t_output)
                ### final res
                p = f'''Summarize this to answer user question, be as concise as possible: {t_output}'''
                res = ollama.generate(model=llm, prompt=q+". "+p)["response"]
            else:
                print('🤬 >', f"\x1b[1;31m{t_name} -> NotFound\x1b[0m")

    if agent_res['message']['content'] != '':
        res = agent_res["message"]["content"]

    print("👽 >", f"\x1b[1;30m{res}\x1b[0m")
    messages.append( {"role":"assistant", "content":res} )
Now, if we run the full code, we can chat with our Agent.

Advanced Agent (Coding)
LLMs know how to code by being exposed to a large corpus of both code and natural language text, where they learn patterns, syntax, and semantics of Programming languages. The model learns the relationships between different parts of the code by predicting the next token in a sequence. In short, LLMs can generate Python code but can’t execute it, Agents can.
I shall prepare a Tool allowing the Agent to execute code. In Python, you can easily create a shell to run code as a string with the native command exec().
import io
import contextlib
def code_exec(code: str) -> str:\
output = io.StringIO()
with contextlib.redirect_stdout(output):
try:
exec(code)
except Exception as e:
print(f"Error: {e}")
return output.getvalue()
tool_code_exec = {'type':'function', 'function':{
'name': 'code_exec',
'description': 'execute python code',
'parameters': {'type': 'object',
'required': ['code'],
'properties': {
'code': {'type':'str', 'description':'code to execute'},
}}}}
## test
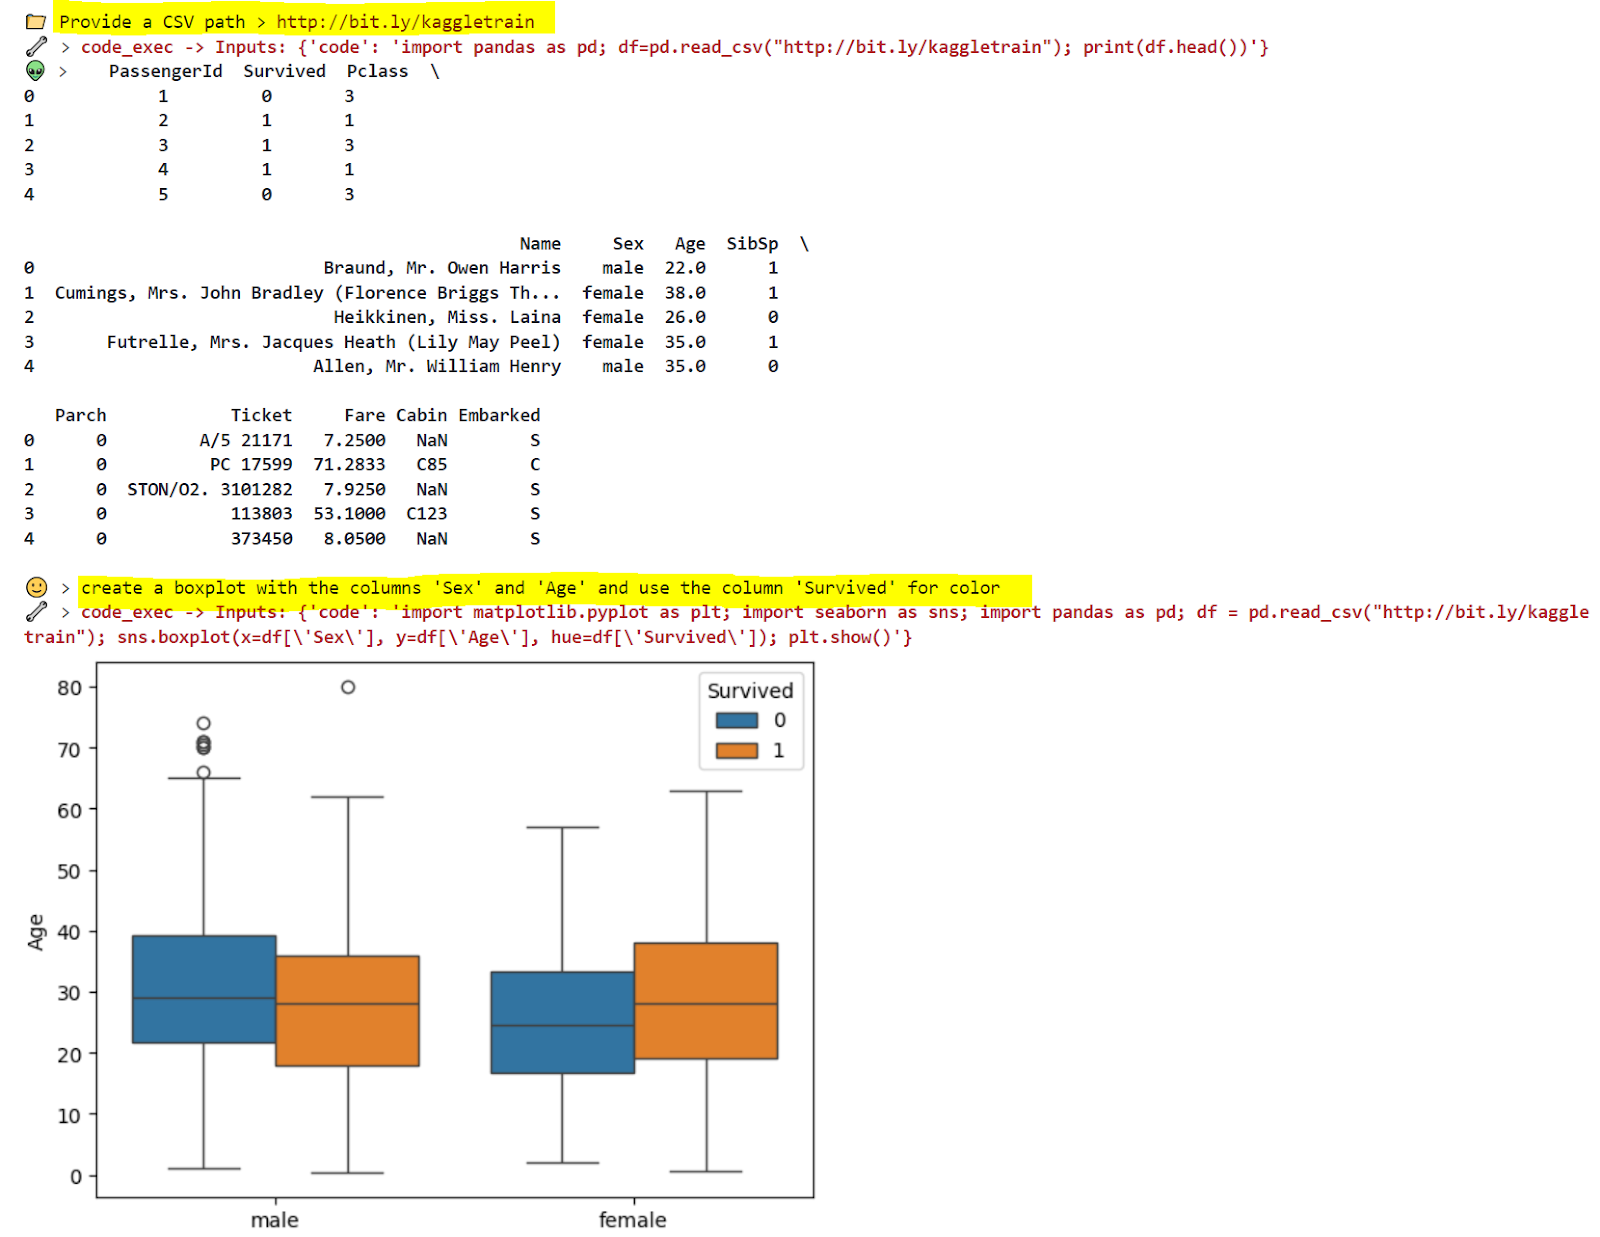
code_exec("a=1+1; print(a)")Just like before, I will write a prompt, but this time, at the beginning of the chat-loop, I will ask the user to provide a file path.
prompt=""'You are an expert data scientist, and you have tools to execute python code.
First of all, execute the following code exactly as it is: 'df=pd.read_csv(path); print(df.head())'
If you create a plot, ALWAYS add 'plt.show()' at the end.
'''
messages = [{"role":"system", "content":prompt}]
start = True

while True:
    ## user input
    try:
        if start is True:
            path = input('📁 Provide a CSV path >')
            q = "path = "+path
        else:
            q = input('🙂 >')
    except EOFError:
        break
    if q == "quit":
        break
    if q.strip() == "":
        continue

    messages.append( {"role":"user", "content":q} )
Since coding tasks can be a little trickier for LLMs, I am going to add also memory reinforcement. By default, during one session, there isn’t a true long-term memory. LLMs have access to the chat history, so they can remember information temporarily, and track the context and instructions you’ve given earlier in the conversation. However, memory doesn’t always work as expected, especially if the LLM is small. Therefore, a good practice is to reinforce the model’s memory by adding periodic reminders in the chat history.
prompt=""'You are an expert data scientist, and you have tools to execute python code.
First of all, execute the following code exactly as it is: 'df=pd.read_csv(path); print(df.head())'
If you create a plot, ALWAYS add 'plt.show()' at the end.
'''
messages = [{"role":"system", "content":prompt}]
memory = '''Use the dataframe 'df'.'''
start = True

while True:
    ## user input
    try:
        if start is True:
            path = input('📁 Provide a CSV path >')
            q = "path = "+path
        else:
            q = input('🙂 >')
    except EOFError:
        break
    if q == "quit":
        break
    if q.strip() == "":
        continue

    ## memory
    if start is False:
        q = memory+"\n"+q
    messages.append( {"role":"user", "content":q} )
Please note that the default memory length in Ollama is 2048 characters. If your machine can handle it, you can increase it by changing the number when the LLM is invoked:
    ## model
    agent_res = ollama.chat(
        model=llm,
        tools=[tool_code_exec],
        options={"num_ctx":2048},
        messages=messages)
In this usecase, the output of the Agent is mostly code and data, so I don’t want the LLM to re-elaborate the responses.
    ## response
    dic_tools = {'code_exec':code_exec}

    if "tool_calls" in agent_res["message"].keys():
        for tool in agent_res["message"]["tool_calls"]:
            t_name, t_inputs = tool["function"]["name"], tool["function"]["arguments"]
            if f := dic_tools.get(t_name):
                ### calling tool
                print('🔧 >', f"\x1b[1;31m{t_name} -> Inputs: {t_inputs}\x1b[0m")
                messages.append( {"role":"user", "content":"use tool '"+t_name+"' with inputs: "+str(t_inputs)} )
                ### tool output
                t_output = f(**tool["function"]["arguments"])
                ### final res
                res = t_output
            else:
                print('🤬 >', f"\x1b[1;31m{t_name} -> NotFound\x1b[0m")

    if agent_res['message']['content'] != '':
        res = agent_res["message"]["content"]

    print("👽 >", f"\x1b[1;30m{res}\x1b[0m")
    messages.append( {"role":"assistant", "content":res} )
    start = False
Now, if we run the full code, we can chat with our Agent.
Conclusion
This article has covered the foundational steps of creating Agents from scratch using only Ollama. With these building blocks in place, you are already equipped to start developing your own Agents for different use cases.
Stay tuned for Part 2, where we will dive deeper into more advanced examples.
Full code for this article: GitHub
I hope you enjoyed it! Feel free to contact me for questions and feedback or just to share your interesting projects.
👉 Let’s Connect 👈