
My mom and I have successfully finished reupholstering my desk chair, and it turned out so good! It’s not perfect, but it’s pretty good for two non-professionals who do reupholstery projects maybe once every three or four years.
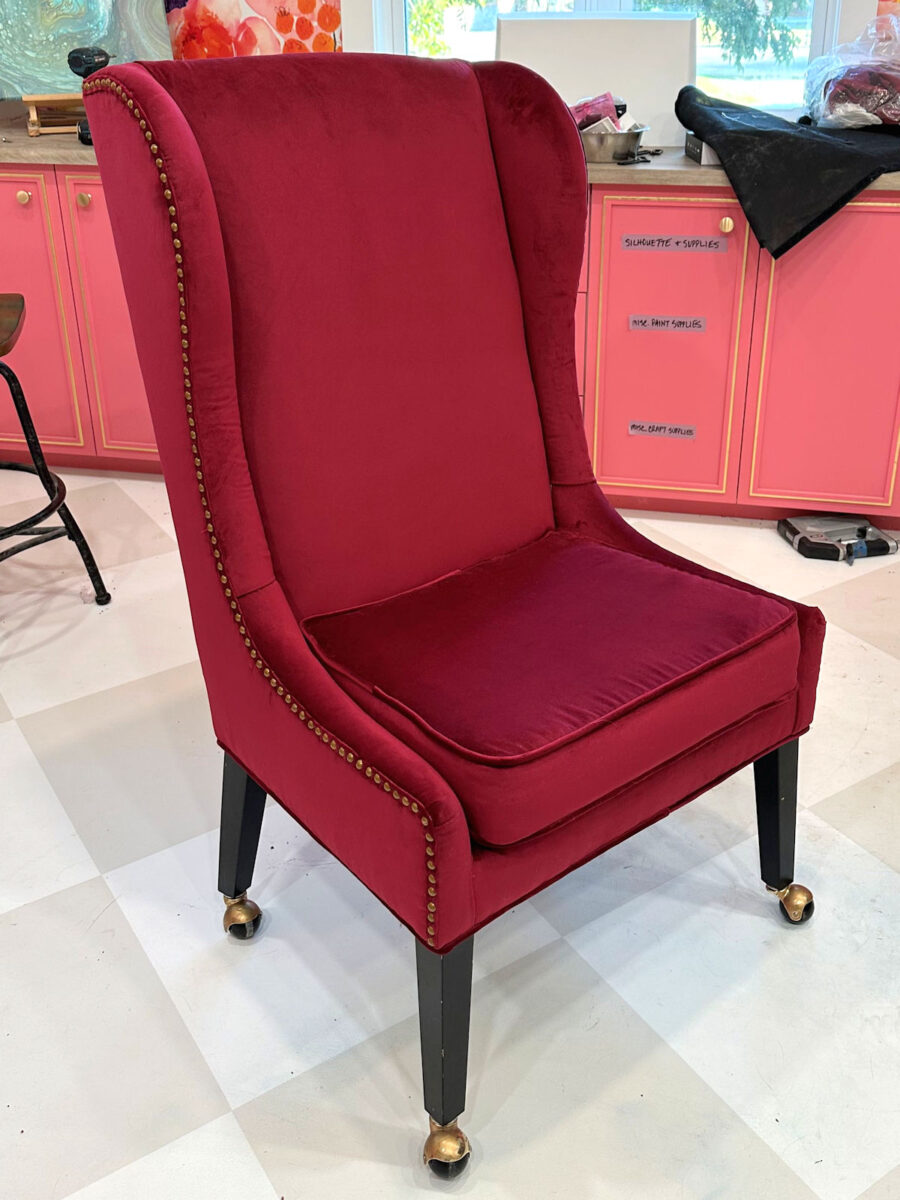
Here’s a look at the finished chair. Well, the upholstery is finished, but I’ve decided that I want to swap out the legs for one of those desk chair swivel bases, so these legs aren’t completely on. If they look wonky, try to look past that. I’m still searching for a pretty wood swivel base on casters. So with that said, here’s a look at the finished reupholstered desk chair.
Here’s a quick before and after look at this chair.

So let me show you how we finished up this chair. When I left off yesterday, the chair looked like this…

And I had this raw edge of fabric showing all around the arms, wings, and the top of the chair back.

So at that point, we still needed to add the trim, nail heads, and sew the seat cushion. To make the flat trim to cover the raw edges of the fabric, I cut strips of fabric to 1.5 inches wide, and then sewed them together end-to-end. In order to sew them together, I placed the ends together at a 90-degree angle and pinned.

And then I sewed them together diagonally.

That gave me an angled seam like this. The reason you want to sew the seam diagonally is so that the entire bulk of a seam isn’t completely in one spot on the trim. This way, the bulk of that seam is spread out over a larger area, so it can be concealed a bit easier.

The trim for this part is just a flat trim, so there’s no cording needed. I did a zigzag stitch all along one edge of the fabric to keep my velvet from fraying, and then I folded the fabric into thirds lengthwise. First, I folded the raw, unstitched edge over…

And then I folded the zigzag stitched edge over that, making sure that it overlapped the first edge just a bit.

And then I stitched right down the middle. Here’s what the front of that trim looked like once it was sewn.

With that trim sewn, I found the center of the trim piece, and lined that up in the center of the chair back and pinned it into place. And then using my hot glue gun, I carefully attached the trim over the raw edge of the fabric, making sure to line up the trim so that the edge of the trim was at the edge of the wood frame. Since I was going to be adding nailhead trim, I needed this trim to be over the wood frame and not just over foam and batting. If you’re not adding nailhead trim, you don’t have to be as careful about placement, you just have to make sure you’re covering the raw edges of the fabric.

I continued working from the center of the back, around the corner onto the wing, and down onto the arm until the whole side had trim covering that raw edge.

And then I finished it by glueing the end of the trim under the chair and trimming off the excess.

Then I repeated that whole process, starting at the center of the chair back and working in the opposite direction until the other side had trim covering the raw edges on that whole side.
With the trim attached, I was ready to add the nailheads. I only ever use individual nailheads. I do not like those nailhead trim strips where you add an actual nailhead about once every four or five nails because I can spot those a mile away. That product, in my humble opinion, will never give a professional look because those actual nailheads every five or six spots are always a slightly different color than the strips, and they stick out like a sore thumb. So if I’m going to do nailhead trim, I’m going to take the time and do it the right way.

You can buy tools specifically made to make this process easier, but since I only do upholstery about once every three years or so, I haven’t spent money on special tools. You need a spacer , a hammer, and something to hold the nailhead. For my spacer, I used a few stuck together nails that were the perfect width. A tack hammer works the best, but I don’t have one, so I used my regular hammer. And while I started off using needle nose pliers to hold my nailheads, I found that the nose of my wire strippers worked so much better because of the flat shape of the nose which allowed me much more control over the nailhead as I hammer it in.

So when you’re not a pro, and you don’t have all of the special tools, I’m very much a “use what you’ve got” kind of person. A strip of nails, a wire stripper, and a construction hammer worked just fine and got the job done.

Here’s one side completely finshed.
After the nailheads were all attached, I needed to finish off the trim by adding covered cording around the bottom of the chair. Covering cording is super easy. Just cut a strip of fabric about 1.5 inches wide, place the cord in the middle of the back of the fabric, fold the fabric around the cord, and sew the two layers of fabric together as close to the cord as possible. A zipper foot on the sewing machine works perfectly for this.

And then to attach this cording, I flipped the chair on it’s front so that the bottom of the chair was accessible, and I placed the cording on the edge of the frame…

And then used this cardboard strip to hold the cording, and stapled them both into place.

The purpose of the cardboard is to keep the cording from rolling back on itself. If you try to staple cording on a chair like this without using the cardboard, you won’t end up with a clean, polished look. The cording will try to fold back and roll up on itself in areas, and you won’t have a consistent look all around. The cardboard strip comes in a roll, and is available at any upholstery shop and at places like JoAnn Fabrics.

The last remaining step was to make the chair cushion. I’m not going to do a thorough tutorial on how to make a cushion. I’ll say this. If you don’t have any experience sewing, the cushion might be a good project to either hire out or do a little bartering with a friend who knows how to sew. Sewing cushions with cording and a zipper isn’t a beginner project, especially when working with thick upholstery fabric. But I will show you the basic concept here.
For the cushion, you need a top and bottom piece, which are identical. Then you’ll need the edge strip that goes all the way around the edge of the cushion. And then you’ll need two long strips of covered cording.
The strip that goes around the edge is make of three pieces of fabric plus a zipper. Piece 1 covers the front edge and most of the edge on each side. Pieces 2 and 3 include a zipper, and this piece is long enough to not only cover the back edge of the seat cushion, but also to wrap around to the sides about two or three inches on each side. So once you get piece 2 and 3 sewn together with the zipper, you smooth it out so that it’s flat, and then sew it to piece 1.

Set that aside and then work on the top and the bottom. You’ll want to attach the cording to the top piece as a separate step, and then attach the cording to the bottom piece as a separate step. In other words, don’t ever try to sew everything together (top, cording, and edge piece) in one step. Get the cording attached to the top piece, and then sew on the edge piece. Sew the cording onto the bottom piece first, and then sew on the edge piece. This picture is my mom sewing the cording onto the top cushion piece as a separate step before even attempting to sew the top to the edge piece.

And then once you get all those pieces together, you have a cushion cover, and you can insert the cushion. And you’ll probably need an extra set of hands for that.
Once the seat cushion was done, the chair was finished!
I’m so pleased with how this turned out. The fabric is so deep and rich in person. I’m not sure if that’s coming across in the pictures, but it’s such a deep red without being too dark.

And with it being velvet, it’ll be easy to clean when my cat sleeps on it, and I’m hoping she won’t be able to shred this one since velvet seems to be a clawing deterrent for her.

I’m really excited about finding a new, pretty swivel base for this chair. I think swapping these black legs for a pretty wood swivel base will take it up a few more notches.

And finally, here’s a peek at the chair by my pink cabinets and behind my desk.

This is a HUGE project that I can now mark off of my list! This was definitely the biggest project I still had to do in this room, so it should a quick sprint to the finish line now.


Addicted 2 Decorating is where I share my DIY and decorating journey as I remodel and decorate the 1948 fixer upper that my husband, Matt, and I bought in 2013. Matt has M.S. and is unable to do physical work, so I do the majority of the work on the house by myself. You can learn more about me here.